从零到负一

【LM02】ARMv8 MMU和Linux的启动

2023/01/05

在上一篇笔记ARMv8 MMU的基础知识中,我们已经了解了ARMv8中MMU的基础知识。这篇笔记将重点关注Linux内核的启动阶段,看看MMU是如何开启,以及临时页表是如何建立起来的。

上电后发生了什么

在介绍Linux内核的启动流程前,我们简单来看看硬件上电后进行的一系列操作。

当硬件上电后,硬件会进行一些初始化,同时ARM Core会跳入RESET Vector进行一系列的初始化。之后BootLoader会将Linux内核从外部存储器(SD卡,FLash ROM等)载入物理内存(一般是载入到特定的地址),然后Linux内核就可以开始执行了(从head.S处开始执行,在开启MMU前都用物理地址进行寻址)。

下图是一个内核镜像文件的VA->PA映射,该图来自 How the ARM32 kernel starts(这是一个32bit系统的映射图,64bit的也类似),我们可以看出几点:

  1. 内核镜像文件在物理内存中存放于低地址位,而其对应的虚拟地址是高地址位;
  2. PHYS_OFFSETPAGE_OFFSET分别用于物理地址和虚拟地址;
  3. 其中有部分VA -> PA是一一对应的,这部分用于保证MMU开启前后,指令的读取不会出错。
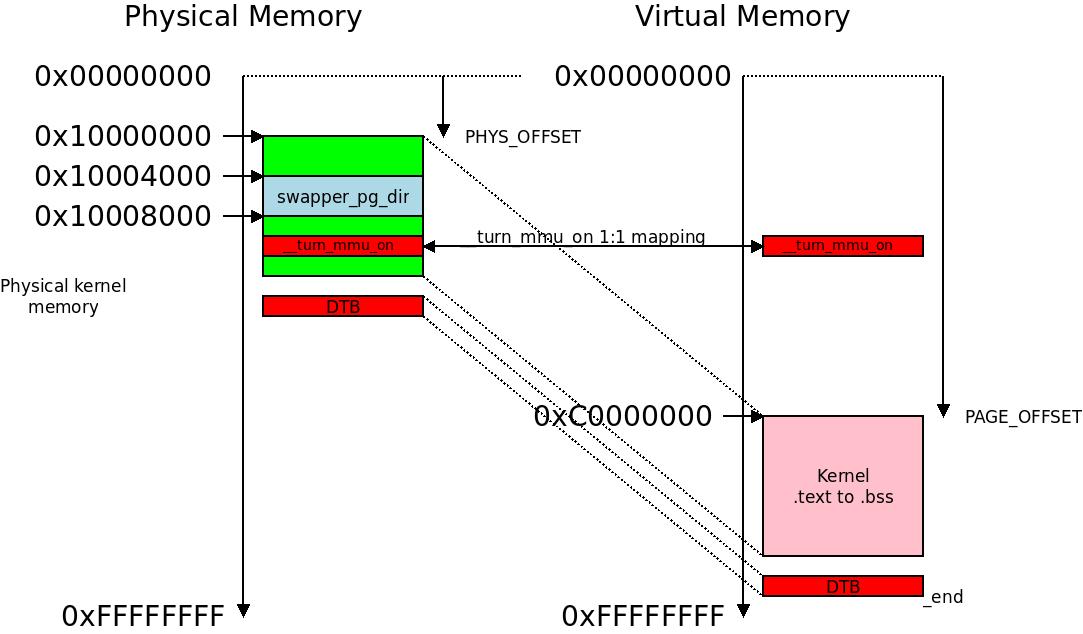
Linux内核的入口程序

从这里开始,我们就要和汇编语言打交道了。说实话,我对汇编只能说是勉强能看懂,因此接下来的内容不需要深入理解。关于MMU的开启的部分可以从大的原理上思考下为什么要这样做,至于源码,简单看看即可。

BootLoader完成它的任务后,Linux内核就开始接管接下来的工作。这部分工作从head.S这个文件开始。

1
2
3
4
5
6
7
8
9
10
11
12
13
14
15
16
17
18
19
20
21
22
23
24
25
26
27
28
// ./arch/arm64/kernel/head.S 

/*
* The following callee saved general purpose registers are used on the
* primary lowlevel boot path:
*
* Register Scope Purpose
* x21 stext() .. start_kernel() FDT pointer passed at boot in x0
* x23 stext() .. start_kernel() physical misalignment/KASLR offset
* x28 __create_page_tables() callee preserved temp register
* x19/x20 __primary_switch() callee preserved temp registers
*/
ENTRY(stext)
bl preserve_boot_args
bl el2_setup // Drop to EL1, w0=cpu_boot_mode
adrp x23, __PHYS_OFFSET
and x23, x23, MIN_KIMG_ALIGN - 1 // KASLR offset, defaults to 0
bl set_cpu_boot_mode_flag
bl __create_page_tables
/*
* The following calls CPU setup code, see arch/arm64/mm/proc.S for
* details.
* On return, the CPU will be ready for the MMU to be turned on and
* the TCR will have been set.
*/
bl __cpu_setup // initialise processor
b __primary_switch
ENDPROC(stext)

这里主要看看和MMU相关的部分,因此我们直接跳到__create_page_tables()这个函数。

页表的创建

在Linux的启动阶段,内核创建了多个页表,包括idmap_pg_dir, swapper_pg_dirinit_pg_dir。其中第一个用于确保开启MMU前后取指地址保持不变,第三个用于在启动阶段映射Linux内核,第二个在之后的paging_init()中会取代init_pg_dir。在MMU开启前,系统是直接使用物理地址进行取指,而开启MMU后,由于有了VA->PA的映射,PA就可能不是之前的PA了,因此需要做一个VA->PA的映射来保证内核的正常工作。

1
2
3
4
5
6
7
8
9
10
11
12
13
14
15
16
17
// ./arch/arm64/kernel/vmlinux.lds.S

. = ALIGN(PAGE_SIZE);
idmap_pg_dir = .;
. += IDMAP_DIR_SIZE;
...
...
swapper_pg_dir = .;
. += SWAPPER_DIR_SIZE;
...
...
BSS_SECTION(0, 0, 0)

. = ALIGN(PAGE_SIZE);
init_pg_dir = .;
. += INIT_DIR_SIZE;
init_pg_end = .;

__create_page_tables Part 1

这一步主要是做一些准备工作,比如获取相关页表的物理地址、清空页表等。

1
2
3
4
5
6
7
8
9
10
11
12
13
14
15
16
17
18
19
20
21
22
23
24
25
26
27
28
29
30
31
32
33
34
35
36
37
38
39
40
41
42
43
44
45
46
47
48
49
50
51
52
53
54
// ./arch/arm64/kernel/head.S 

/*
* Setup the initial page tables. We only setup the barest amount which is
* required to get the kernel running. The following sections are required:
* - identity mapping to enable the MMU (low address, TTBR0)
* - first few MB of the kernel linear mapping to jump to once the MMU has
* been enabled
*/
__create_page_tables:
mov x28, lr

/*
* Invalidate the init page tables to avoid potential dirty cache lines
* being evicted. Other page tables are allocated in rodata as part of
* the kernel image, and thus are clean to the PoC per the boot
* protocol.
*/
// ----------------------------------------------------------------------- (1)
// 使用adrp指令,将init_pg_dir和init_pg_end的相对地址放入x0/x1
// 这属于PIC - Position-Independent Code,这篇笔记最后会简单介绍PIC相关内容
adrp x0, init_pg_dir
adrp x1, init_pg_end
sub x1, x1, x0
// ----------------------------------------------------------------------- (2)
// 在MMU开启前,dcache是不会被使用的(memory不是cacheable类型)这么做是为了避免产生
// 不必要的问题
bl __inval_dcache_area

/*
* Clear the init page tables.
*/
// ----------------------------------------------------------------------- (3)
// 清空init_pg_dir页表
adrp x0, init_pg_dir
adrp x1, init_pg_end
sub x1, x1, x0
1: stp xzr, xzr, [x0], #16
stp xzr, xzr, [x0], #16
subs x1, x1, #64
b.ne 1b

mov x7, SWAPPER_MM_MMUFLAGS

/*
* Create the identity mapping.
*/
// ----------------------------------------------------------------------- (4)
adrp x0, idmap_pg_dir
adrp x3, __idmap_text_start // __pa(__idmap_text_start)
...
...

(1) 使用adrp指令获取idmap_pg_dir物理地址(这里使用PIC技术)并存入x0
(2) 中清空这几个页表所在的dcache - 在MMU开启前,dcache是不会被使用的(内存不是cacheable类型)这么做是为了避免不必要的问题;
(3) 将这几个页表置零(表示这些页表项都是无效的);
(4) 获取idmap_pg_dir__idmap_text_start,分别存入x0x3

__create_page_tables Part 2

接下来,我们就要开始初始化PGD, PUD, PMDPTE了,

1
2
3
4
5
6
7
8
9
10
11
12
13
14
15
16
17
18
19
20
21
22
23
24
25
26
27
28
29
30
31
32
33
34
35
36
37
38
    // ./arch/arm64/kernel/head.S 

...
...
mov x4, EXTRA_PTRS
create_table_entry x0, x3, EXTRA_SHIFT, x4, x5, x6
/*
* If VA_BITS == 48, we don't have to configure an additional
* translation level, but the top-level table has more entries.
*/
mov x4, #1 << (PHYS_MASK_SHIFT - PGDIR_SHIFT)
str_l x4, idmap_ptrs_per_pgd, x5
1:
ldr_l x4, idmap_ptrs_per_pgd
mov x5, x3 // __pa(__idmap_text_start)
adr_l x6, __idmap_text_end // __pa(__idmap_text_end)

// ----------------------------------------------------------------------- (1)
// 将[__idmap_text_start, __idmap_text_end]区域一一对应地映射到虚拟内存空间
map_memory x0, x1, x3, x6, x7, x3, x4, x10, x11, x12, x13, x14

/*
* Map the kernel image (starting with PHYS_OFFSET).
*/
adrp x0, init_pg_dir
mov_q x5, KIMAGE_VADDR + TEXT_OFFSET // compile time __va(_text)
add x5, x5, x23 // add KASLR displacement
mov x4, PTRS_PER_PGD
adrp x6, _end // runtime __pa(_end)
adrp x3, _text // runtime __pa(_text)
sub x6, x6, x3 // _end - _text
add x6, x6, x5 // runtime __va(_end)

// ----------------------------------------------------------------------- (2)
// 将[_text, _end]区域,也就是整个kernel区域映射到虚拟空间
map_memory x0, x1, x5, x6, x7, x3, x4, x10, x11, x12, x13, x14
...
...

这里我就不深究细节了,简单来说就是
(1) 将__idmap_text_start__idmap_text_end的区域一一对应地映射到虚拟内存空间。这样,即使MMU开启了,ARM Core也能正常地取指。注意,MMU开启的部分代码一定在__idmap_text_start__idmap_text_end之间。
(2) 将整个内核映射到虚拟空间。注意,这部分包括__idmap_text_start__idmap_text_end的区间,也就是说这部分其实映射了两遍。

具体的映射形式可以参考最开始的那幅图,注意其中有部分映射了两遍。

开启MMU

MMU是在__primary_switch中通过调用__enable_mmu开启的。在开启MMU前,我们还需要对ARM的各种寄存器进行设置,这里我就不详细记录了。下面直接看__primary_switch__enable_mmu这两个函数:

1
2
3
4
5
6
7
8
9
10
11
12
13
14
15
16
17
18
19
20
21
22
23
24
25
26
27
28
29
30
31
32
33
34
35
36
37
38
39
40
41
42
43
44
45
46
47
48
49
50
51
52
53
54
55
56
57
58
59
60
61
62
63
64
65
66
67
68
69
70
71
72
73
74
75
76
77
78
79
80
81
82
83
84
85
86
// ./arch/arm64/kernel/head.S 

__primary_switch:
#ifdef CONFIG_RANDOMIZE_BASE
mov x19, x0 // preserve new SCTLR_EL1 value
mrs x20, sctlr_el1 // preserve old SCTLR_EL1 value
#endif

adrp x1, init_pg_dir
bl __enable_mmu
#ifdef CONFIG_RELOCATABLE
bl __relocate_kernel
#ifdef CONFIG_RANDOMIZE_BASE
ldr x8, =__primary_switched
adrp x0, __PHYS_OFFSET
blr x8

/*
* If we return here, we have a KASLR displacement in x23 which we need
* to take into account by discarding the current kernel mapping and
* creating a new one.
*/
pre_disable_mmu_workaround
msr sctlr_el1, x20 // disable the MMU
isb
bl __create_page_tables // recreate kernel mapping

tlbi vmalle1 // Remove any stale TLB entries
dsb nsh

msr sctlr_el1, x19 // re-enable the MMU
isb
ic iallu // flush instructions fetched
dsb nsh // via old mapping
isb

bl __relocate_kernel
#endif
#endif
// ------------------------------------------------------------------------------------------- (1)
// 这步特别关键,br x8这条指令不是PIC,通过这条指令(当前MMU已经打开)PC就开始使用虚拟地址空间了
ldr x8, =__primary_switched
adrp x0, __PHYS_OFFSET
br x8
ENDPROC(__primary_switch)

/*
* Enable the MMU.
*
* x0 = SCTLR_EL1 value for turning on the MMU.
* x1 = TTBR1_EL1 value
*
* Returns to the caller via x30/lr. This requires the caller to be covered
* by the .idmap.text section.
*
* Checks if the selected granule size is supported by the CPU.
* If it isn't, park the CPU
*/
ENTRY(__enable_mmu)
mrs x2, ID_AA64MMFR0_EL1
ubfx x2, x2, #ID_AA64MMFR0_TGRAN_SHIFT, 4
cmp x2, #ID_AA64MMFR0_TGRAN_SUPPORTED
b.ne __no_granule_support
update_early_cpu_boot_status 0, x2, x3
adrp x2, idmap_pg_dir
// ------------------------------------------------------------------------------------------- (2)
// x1 = init_pg_dir; x2 = idmap_pg_dir
// 注意x2存入ttbr0_el1而x1存入ttbr1_el1
phys_to_ttbr x1, x1
phys_to_ttbr x2, x2
msr ttbr0_el1, x2 // load TTBR0
offset_ttbr1 x1
msr ttbr1_el1, x1 // load TTBR1
isb
msr sctlr_el1, x0
isb
/*
* Invalidate the local I-cache so that any instructions fetched
* speculatively from the PoC are discarded, since they may have
* been dynamically patched at the PoU.
*/
ic iallu
dsb nsh
isb
ret
ENDPROC(__enable_mmu)

(1) 参考注释
(2) idmap_pg_dir之所以放入ttbr0_el1,是因为当MMU开启后,PC使用的地址还和之前一样,都是0x00XX开头的地址。而这些地址都会去查看ttbr0_el1对应的页表,因此需要将 idmap_pg_dir放入

至此,汇编代码部分基本结束,之后就会调用start_kernel()函数,进入C语言的世界了。

实验系统页表布局

在整个Linux内核的学习过程中,我使用了《奔跑吧内核第二版》的实验平台,在该实验平台上,其页表布局如下:

1
2
3
4
5
6
7
8
9
// 4级页表+4K的页面,VA_BITS = 48

|63 --- 48|47 --- 39|38 --- 30|29 --- 21|20 --- 12|11 --- 0|
| | | | | |-- Page offset ( = 4KB )
| | | | |------------ Level 3 PTE idx (512 * 4KB = 2MB )
| | | |---------------------- Level 2 PMD idx (512 * 512 * 4KB = 1GB )
| | |-------------------------------- Level 1 PUD idx (512 * 512 * 512 * 4K = 512GB)
| |------------------------------------------ Level 0 PGD idx (512 * 512 * 512 * 512 * 4K = 256TB)
|-- 全1或0

一个疑问

之前写完这篇笔记后,有一个问题一直没有想明白,

在开启MMU之前,CPU是在0x00XX区域进行取指;而在开启MMU后,CPU是在0xFFXX区域进行取指。CPU到底是怎么做到这种切换的呢?MMU怎么会改变CPU发出的地址?它应该只能改变CPU发出地址的映射地址吧?

这个疑问困扰了我很多天,翻阅了大量的资料后,我终于明白是怎么回事了。

这里要牵涉PIC(Position Independent Code)和非PIC汇编代码,在heads.S中,绝大多数代码都是PIC的,只有开启MMU后的一些代码是非PIC的。在开启MMU前,CPU是直接在代码段的物理地址进行取指执行的。因为heads.S开始的代码都是PIC的,因此运行没有问题(此时PC还在0x00XX区域)。当开启MMU后,heads.S就开始执行非PIC的代码。因为代码段在编译链接时已经有了自己的虚拟地址,通过非PIC代码,CPU会跳转到相应的虚拟地址(此时PC跳转到0xFFXX区域)进行取指执行。到这里之后,即使是PIC代码也不会有问题,因为PC已经在0xFFXX区域了。

比如说,br就是一个非PIC的指令,它最终在MMU开启后,将CPU的取指空间切换到了0xFFXX区域(之前都在PC+/- 一定范围内寻指,并且PC也是在0x00XX区域)。关于PIC相关内容,请参考 linux内核链接脚本vmlinux.lds分析(十一)

bladrp都是PIC指令, br是非PIC指令。 adrp还比较特殊,它可以找到当前指令+/- 4GB空间的地址(因此可以处理64位的地址),并且其地址是4KB对齐的(也就是说低12位都是0)。head.S中页表使用的地址都满足这个要求,因此可以用adrp来进行相对地址跳转。

PIC指令

这里简单说说PIC指令是如何工作的,比如bl disable_watchdog这个指令,它其实是获取disable_watchdog地址后,取其最后几位偏移。因为bl disable_watchdog指令和disable_watchdog在同一个区域,因此通过最后这几位偏移就可以和当前pc算出它们的距离,通过这个距离,pc就会跳转到正确的地方。上个例子看看,

1
2
3
4
5
6
7
8
9
10
11
12
13
14
// 0x5fe000d8 - 0x5fe0008c = 0x4C
// PC + 0x8 + 0x44 就可以跳转到 disable_watchdog 了
5fe0008c: eb000011 bl 5fe000d8 <disable_watchdog>
5fe00090: e59ff2f8 ldr pc, [pc, #760] ; 5fe00390 <_mmu_table_base+0x4>
...
5fe000d8 <disable_watchdog>:
5fe000d8: e59f02b8 ldr r0, [pc, #696] ; 5fe00398 <_mmu_table_base+0xc>
5fe000dc: e3a01000 mov r1, #0
5fe000e0: e5801000 str r1, [r0]
5fe000e4: e1a0f00e mov pc, lr
...
5fe0038c <_mmu_table_base>:
5fe0038c: 5fe04000 svcpl 0x00e04000
5fe00390: 5fe000d8 svcpl 0x00e000d8

从上面例子可以看出,如果要bl到一个很远的地方,那么CPU就会跳转到一个错误的地方,因为跳转地址的高位和PC的高位不同。根据最后几位偏移不能计算出正确的跳转地址。

参考资料

  1. ARM64的启动过程之(二):创建启动阶段的页表
  2. ARM64的启动过程之(四):打开MMU
  3. ARMv8 MMU及Linux页表映射
  4. arm64_linux启动流程分析05_配置内核启动的临时页表
  5. linux内核链接脚本vmlinux.lds分析(十一)
  6. How the ARM32 kernel starts
CATALOG
  1. 1. 上电后发生了什么
  2. 2. Linux内核的入口程序
  3. 3. 页表的创建
    1. 3.1. __create_page_tables Part 1
    2. 3.2. __create_page_tables Part 2
  4. 4. 开启MMU
  5. 5. 实验系统页表布局
  6. 6. 一个疑问
  7. 7. PIC指令
  8. 8. 参考资料